2013年4月29日月曜日

Notification sound does not work.


A. Please note the following things listed below.


 - Ensure silent mode is off.
 - Ensure the volume of the ringer and alerts is Not 0.
 - Go to [Settings>Notifications>GPS-R] and make sure the sound is on.

2013年4月28日日曜日

I cannot tweet despite twitter is enabled.


A. Please note the following things listed below.


 - Ensure twitter is Not restricted.I cannot tweet when I try to tweet the same tweet in a row  because I hit a Twitter Limit.
 - Go to [Settings>Twitter] and make sure "GPS-R" is allowed to use your account.
 - Ensure the network is connected.

2013年4月27日土曜日

I cannot get notifications when I'm in the notification range


A. Please note the following things listed below.

 - Notifications depend on [Notification Range] setting and movement speed because of the GPS' accuracy. 
 - Go to [Settings>Notifications] and check "GPS-R" settings.
 - To use on background, you need to turn the [following mode button] on. When  [following mode button] is blue, Following mode is on.


2013年4月26日金曜日

Does this application run in the background?


A. Yes. Once you set the alarm, you can do whatever you want to  listen to a music, check emails or play a game! 
GPS-R will let you know when you get close to the destination, even if other applications are running.


2013年4月25日木曜日

[GPS-R for Anndroid] How to use


Here is a very simple instruction.

Add new location (20 at the most)


- Setting a destination on the Map Screen enables you to see the Setting Screen. 
- You can set an alarm configurations which are TO DO, How you will be notified, Notification range and Turning the Auto Search on and off.


Keyword Search (map window)
- You can use search word to find your destination. If there are more than two search results, pick one to set it as your destination.


Destination List


- Choose the Reminder List to confirm destinations.

Deletion of destination
- Enables you to remove unnecessary destination settings.


Auto Search
- Searches next destination automatically, using the key that you specified.

2013年4月24日水曜日

How to set up your email account


iCloud
Email : xx@me.com or xx@icloud.com
Login : xx@me.com or xx@icloud.com
Password : Apple ID Password

* How to Determine the Password
  Tap the check iForgot in AppStore account


Gmail
Email : xx@gmail.com
Login : xx@gmail.com
Password : google account password

* How to Determine the Password
  Tap at login "Can’t access your account?


2013年4月23日火曜日

[GPS-R for iOS] How to use


Map


Add new destination
-  Tap “add button” to add a new destination (red pin).


 - A reminder can be created by long aggressiveness or the tap or map of a pin addition button 
Tap the disclosure button to set details (sound, vibration, range etc). 
 -  You can drag the red pin and move it. 
 -  You can choose and set an address that is registered in your contacts. Tap Contacts and choose an address.


Settings
 -  The screen changes by tapping the disclosure button.


 -  You can enter your “To Do” memo, set vibration/sound/Twitter
    auto-search activation and specify notification range. 
 -  You can also delete the destination.


Mail Settings
 - By turning ON the notice of e-mail, e-mail can be transmitted at the time of a notice.


 -  It is necessary to set a mail address to GPS-R. Please have a look here about the setting method. 
 -  Transmission to two or more addresses can be performed in continuing and inputting a mail address by comma separated values. 


Twitter Settings
 - Turn on Twitter Notification to post a tweet when you get a notification


 -  You can set your tweet and location information on Twitter Settings screen
 -  Add your iPhone/iPod to your Twitter account to Use the Twitter function.


Following mode
 -  Tap “following mode button” to show a blue-highlighted circle which shows your current location.
 -  The radius of the circle is based on the GPS' accuracy. 
 -  The higher the GPS' accuracy is, the smaller the circle is. 
 -  The circle and the map will follow you when you move.
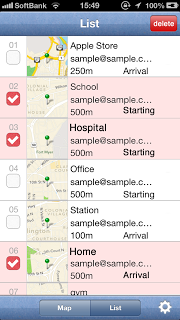

View mode
 -  If the tap of the reminder list button is carried out, the reminder registered now will be displayed.


 -  Tap the A setup of a notice can be performed in a left end check box. Only the reminder which the check is made is the target of a notice.
If the tap of the reminder is carried out, a map is movable to the set-up point. 
 -  Tap “GPS-R” button at the upper left corner to go back to the previous screen. 
If the tap of the disclosure button is carried out, it will move to the setting screen of each reminder.
 -  Deletion of a reminder can be performed when the tap of the edit button is carried out.


Send the destination


 -  You can send an e-mail with the destination you have set
 -  From the destination lists, you can send an e-mail with a destination file attached.Tap mail button from the page of the destination you want to send. And then the mail send screen will be displayed
 -  For the receiver, Run GPS-R from the attached file (.gpsr file) to set the destination 


Search
 -  You can search the location within the currently dysplayed map by entering keywords.


 -  Results are shown as green pins. 
 -  You can't drag them. 
 -  Tap the disclosure button to set as your destination.


Alerm
 -  Alarm dialog pops up when you enter the “notification range” of the destination you have set.


 -  Tap “Snooze”
“Auto Search”ON :
The application automatically searches the closest location with the keyword (within the currently displayed map) and set there as a new destination.
“Auto Search”OFF :
The alarm is disabled until you go outside of the notification range.

 -  Tap “OK” 
The destination is deleted automatically.


Background mode


 -  You can also receive notifications when “Home screen” or “Sleep screen” is displayed, or when other applications are running on the screen. 
 -  For setting the “Background mode”, please press “Home button” while “Following mode” is activated. 
* For more information on “Following mode”, please go to the web link.

 -  Tap “Close button” 
It finishes a phone call. 

 -  Tap “View” 
It runs GPS-R. 
* Running GPS-R right after a notification enable you to choose “Snooze” or “OK” in this application. 
* In case you don't choose anything, “Snooze” will be automatically selected.


Add-on
*Remove Function Limitations Exchange


E-mail transmission at the time of a notice.
 -  Exchange Reminders through e-mail
 -  Post a Tweet When you get a Notification
 -  Use Songs as Ringtones
 -  AD FREE


*How to Upgrade
1.Tap the information button on the bar at the bottom of the screen
2.Tap [Tap to Upgrade] button at the top of the page
3.A dialogue will be displayed and ask if you want to purchase the Upgrade Version. Tap [Purchase] to remove function limitations

 -  You can remove function limitations from each page where the functions are locked
 -  The same functions will be enabled whether from which page you remove function limitations 
*The setting method of a mail address.
It is possible to transmit e-mail by setting a mail address as GPS-R at the time of a notice. 


1.It progresses with map screen > configuration screen (icon of gear) > mail, and changes to a mail address setting screen. 
2.[Address],[login name],[password] are entered and the tap of the preservation button is carried out. 
3.A setup will be completed if the check of a mail address can be taken. 
4.Furthermore, when a detailed setup is required, the item of a detailed setup is inputted. 

 -  'me.com', 'i.softbank.jp', and 'ezweb.ne.jp' of the domain of the mail address set up as notice mail are recommendation. 
 -  Setting of the email application of the iPhone standard is useful for e-mail address setting.

2013年4月22日月曜日

[elite-i] How to use


1)Let's choose Panda that you want to play with!


Tap a picture to start.


2)STAGE1:Practice question


No time limit for this stage and you can try it again.


3)STAGE2:Questions


After Practice question, go to the next stage.
You will answer the 5 questions in a row.
This stage sets a time limit for each question and you will answer before Panda gets to the goal.
Don’t worry about the mistake and go on the next question.

Your children can develop their thinking skill and the ability to concentrate.
"Elite-i" will keep your children engaged in fun and educational activities using your iPhone/iPad.

2013年4月21日日曜日

[Ki-Ri-e] How to use

Create new Kirie work


1. Press button in the initial window and choose a fold type in "Fold" window. An animation starts - you can skip it by double-tapping thte screen or by pressing "Cut" button shown in the navigation bar.


Draw cutting lines and enjoy creating your design in "Cut" window.


* Buttons shown in "Cut" window; 
 = you can undo the previous operation. 
 = reset the size and position of the Origami. 
* You can pinch in to zoom in, pinch out to zoom out, or move Origami using 2 fingers. 
 = you can set cutting sharpness and cutting selection mode. 
* To change the cutting sharpness, drag the “Cut Sharpness” slider. 
* To turncate the smaller part automatically, switch the “Auto” button on. If you switch the “Auto” button off, you can manually choose which part you will remain, every time you draw a cutting line.  = the window moves to "About the Work" window. You can name your artwork and you also can change the Origami/the background.


Press "open" button to start an animation. Your Kirie work will be unfolded. To skip the animation, double tap the screen or press "Open" button shown in the navigation bar. 

You can twirl the unfolded image in "Open" window by touching or by blowing. 

Press "save" button in "Open" window to save your Kirie artwork. The image will be saved in Camera Roll.

Edit saved data.


1. Choose one you want to edit (tap ">" mark) from the list of the initial window. 
2. Edit your work in "Cut" window (just the same as above).

Delete saved data


1. Swipe to show "delete" button in the list of the initial window. Press "Delete" and choose "Delete" in the action sheet. 
2. Press "Edit" button at the buttom of the initial window. Touch mark, press "Delete" button and choose "Delete" in the action sheet. 
* The data will be deleted from the application, but the image data in Camera Roll will remain.

Sort your works
1. Press "Edit" button at the buttom of the initial window. Hold mark on the right and move it to wherever you want.

2013年4月20日土曜日

Q. "Undo" button sometimes doesn't work.


A. You can undo only 100 times. Also, note that if you choose a Ki-Ri-e work that you already made from the top window, "undo" will work only for the further operation.


2013年4月18日木曜日

[I'm here Mail] How to use


[ I'm here Mail ] is an automatic email sending application that uses your location information. 
•Automate daily communications
• Have important people use it
• Send emails while driving


1.Set up an e-mail account


First let's register an email account. For registration you will need an email address, login name, and password.
• How to set up email accounts


2.Setting a pin


Add a pin to where you want to send an email. You can add red pins to selected locations from your address book or from addresses and place names using the search bar. And, when you have added a pin to a place on the map you want, then make the pin purple by holding down on the map. If you hold down while the pin's bubble is displayed you can lift it up. When you have decided on the pin’s location, tap the bubble’s arrow button.


3.Register a pin


Then assign information to the pin. You can change settings after they are made. You can register up to 20 pins.

Location...The name of the pin. The subject line in the email will be "Arrived in XXXX," so give it a name to be passed on to the recipient.
Send...Switch mail transmission on or off.
To...The recipient of the email. You can input it directly or from your address book. You can also choose multiple recipients.
Body...The body of the email. It will scroll down when there is a new line.
Timing...The timing for sending the email. Choose from departure time or arrival time.
Notification Range...The distance from the pin when an email will be sent.
Time Settings...You can limit the days of the week and time periods.

4.Managing a pin


Registered pins turn green. You can lift them up, and edit using the bubble’s arrow button or list. On the list you can manage sending to ON/OFF, and you can select and delete multiple at a time.

5.Sending email
After the GPS button is set to ON, emails will be sent.


An email can be sent after each setting.


* Multiple consecutive emails may be sent in areas with low GPS accuracy. It is recommended that you test it by setting yourself as the addressee. 
* Battery power is consumed more quickly as it will obtain your current location while in use.